Batch System
Introduction
The batch system is a load distribution implementation that ensures convenient and fair use of a shared resource. Submitting jobs to a batch system allows a user to reserve specific resources with minimal interference to other users. All users are required to submit resource-intensive processing to the compute nodes through the batch system - attempting to circumvent the batch system is not allowed.
On Terra, Slurm is the batch system that provides job management.
Using Drona Workflow Engine to create and submit Jobs
The following sections will discuss the batch system in detail and how to manually create, submit, and monitor batch jobs, but first, we will show a more user-friendly way to create and submit batch jobs.
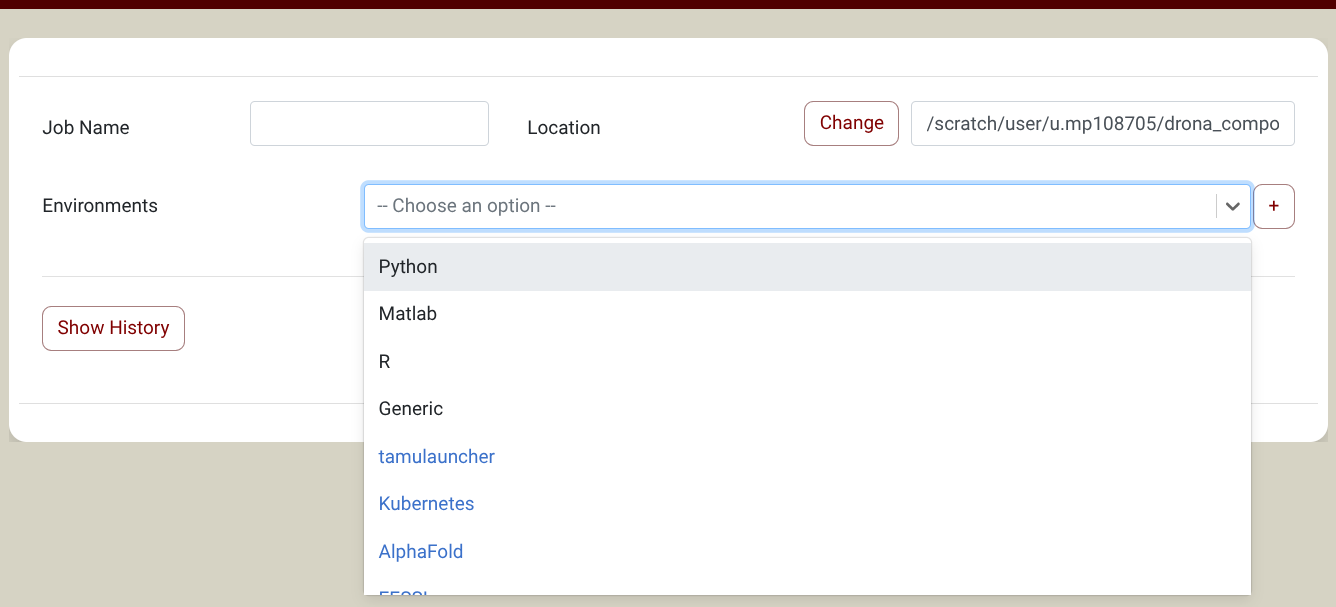
Drona Workflow Engine, developed by HPRC, provides a 100% graphical interface to generate and submit Generic jobs without the need to write a Slurm script yourself or even be aware of Slurm syntax and Generic internals. The Drona app is available on all HPRC Portals under the Jobs tab (Screenshot) .
you will find Generic in the Environments Dropdown (Screenshot). NOTE: If you don't see Generic in the Environments Dropdown, you need to import it first. Click on the + sign next to the environments dropdown and select the Generic environment in the pop-up window. You only need to do this once. See the import section for more information about environments.
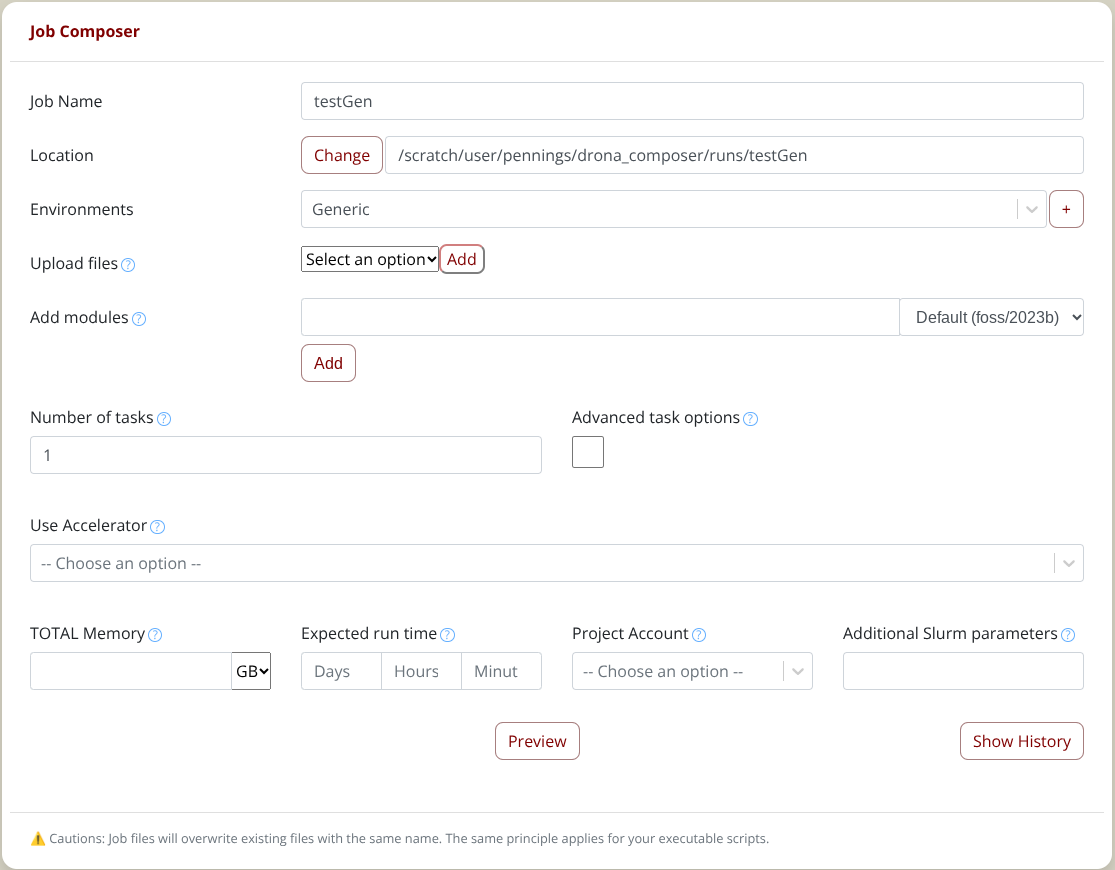
Once you select the Generic environment, the form will expand with Generic specific fields (Screenshot) to guide you in providing all the needed information. To generate the Generic job files, click the Generate or Preview button. This will first show a fully editable preview screen with the generated job scripts. In the preview window, you can enter all the commands you want to execute in the batch script. To submit the job, click on the submit button, and Drona will submit the generated job on your behalf. For detailed information about Drona Workflow Engine, checkout the Drona Workflow Engine Guide
If you experience any issues or have any suggestions, please get in touch with us at help@hprc.tamu.edu
Building Job Files
While not the only method of submitted programs to be executed, job files fulfill the needs of most users.
The general idea behind job files follows:
- Request resources
- Add your commands and/or scripts to run
- Submit the job to the batch system
In a job file, resource specification options are preceded by a script directive. For each batch system, this directive is different. On Terra (Slurm) this directive is #SBATCH. For every line of resource specifications, this directive must be the first text of the line, and all specifications must come before any executable lines. An example of a resource specification is given below:
#SBATCH --jobname=MyExample #Set the job name to "MyExample"
Note: Comments in a job file also begin with a # but Slurm recognizes #SBATCH as a directive.
A list of the most commonly used and important options for these job files are given in the following section.
Basic Job Specifications
Several of the most important options are described below. These basic options are typically all that is needed to run a job on Terra.
| Specification | Option | Example | Example-Purpose |
|---|---|---|---|
| Wall Clock Limit | --time=[hh:mm:ss] | --time=05:00:00 | Set wall clock limit to 5 hours 00 min |
| Job Name | --job-name=[SomeText] | --job-name=mpiJob | Set the job name to "mpiJob" |
| Total Task/Core Count | --ntasks=[#] | --ntasks=96 | Request 96 tasks/cores total |
| Tasks per Node | --ntasks-per-node=# | --ntasks-per-node=48 | Request exactly (or max) of 48 tasks per node |
| Memory Per Node | --mem=value[K|M|G|T] | --mem=120G | Request 120 GB per node |
| Combined stdout/stderr | --output=[OutputName].%j | --output=mpiOut.%j | Collect stdout/err in mpiOut.[JobID] |
It should be noted that Slurm divides processing resources as such: Nodes -> Cores/CPUs -> Tasks
A user may change the number of tasks per core. For the purposes of this guide, each core will be associated with exactly a single task.
Optional Job Specifications
A variety of optional specifications are available to customize your job. The table below lists the specifications which are most useful for users of Terra.
| Specification | Option | Example | Example-Purpose |
|---|---|---|---|
| Set Allocation | --account=###### | --account=274839 | Set allocation to charge to 274839 |
| Email Notification I | --mail-type=[type] | --mail-type=ALL | Send email on all events |
| Email Notification II | --mail-user=[address] | --mail-user=howdy@tamu.edu | Send emails to howdy@tamu.edu |
| Specify Queue | --partition=[queue] | --partition=gpu | Request only nodes in gpu subset |
| Specify General Resource | --gres=[resource]:[count] | --gres=gpu:1 | Request one GPU per node |
| Specify a specific gpu type | --gres=gpu:[type]:[count] | --gres=gpu:v100:1 | Request v100 gpu: type=k80 or v100 |
| Submit Test Job | --test-only | Submit test job for Slurm validation | |
| Request Temp Disk | --tmp=M | --tmp=10240 | Request at least 10 GB in temp disk space |
| Request License | --licenses=[LicenseLoc] | --licenses=nastran@slurmdb:12 |
Alternative Specifications
The job options within the above sections specify resources with the following method:
- Cores and CPUs are equivalent
- 1 Task per 1 CPU desired
- You specify: desired number of tasks (equals number of CPUs)
- You specify: desired number of tasks per node (equal or less than the total number cores per compute node)
- You get: total nodes equal to #ofCPUs/#ofTasksPerNodes
- You specify: desired Memory per node
Slurm allows users to specify resources in units of Tasks, CPUs, Sockets, and Nodes.
There are many overlapping settings and some settings may (quietly) overwrite the defaults of other settings. A good understanding of Slurm options is needed to correctly utilize these methods.
Specification |
Option |
Example |
Example-Purpose |
|---|---|---|---|
Node Count |
--nodes=[min[-max]] |
--nodes=4 |
Spread all tasks/cores across 4 nodes |
CPUs per Task |
--cpus-per-task=# |
--cpus-per-task=4 |
Require 4 CPUs per task (default: 1) |
Memory per CPU |
--mem-per-cpu=MB |
--mem-per-cpu=2000 |
Request 2000 MB per CPU |
Memory per Node (All, Multi) |
--mem=0 |
Request the least-max available memory for any node across all nodes |
|
Tasks per Socket |
--ntasks-per-socket=# |
--ntasks-per-socket=6 |
Request max of 6 tasks per socket |
Sockets per Node |
--sockets-per-node=# |
--sockets-per-node=2 |
Restrict to nodes with at least 2 sockets |
If you want to make resource requests in an alternative format, you are free to do so. Our ability to support alternative resource request formats may be limited.
Environment Variables
All the nodes enlisted for the execution of a job carry most of the environment variables the login process created: HOME, SCRATCH, PWD, PATH, USER, etc. In addition, Slurm defines new ones in the environment of an executing job. Below is a list of most commonly used environment variables.
| Variable | Usage | Description |
|---|---|---|
| Job ID | $SLURM_JOBID | Batch job ID assigned by Slurm. |
| Job Name | $SLURM_JOB_NAME | The name of the Job. |
| Queue | $SLURM_JOB_PARTITION | The name of the queue the job is dispatched from. |
| Submit Directory | $SLURM_SUBMIT_DIR | The directory the job was submitted from. |
| Temporary Directory | $TMPDIR | This is a directory assigned locally on the compute node for the job located at /tmp/job.$SLURM_JOBID. Use of $TMPDIR is recommended for jobs that use many small temporary files. |
Basic Slurm Environment Variables
Note: To see all relevant Slurm environment variables for a job, add the following line to the executable section of a job file and submit that job. All the variables will be printed in the output file.
env | grep SLURM
Executable Commands
After the resource specification section of a job file comes the executable section. This executable section contains all the necessary UNIX, Linux, and program commands that will be run in the job. Some commands that may go in this section include, but are not limited to:
- Changing directories
- Loading, unloading, and listing modules
- Launching software
An example of a possible executable section is below:
cd $SCRATCH      # Change current directory to /scratch/user/[username]/
ml purge         # Purge all modules
ml intel/2022a   # Load the intel/2022a module
ml               # List all currently loaded modules

./myProgram.o    # Run "myProgram.o"
For information on the module system or specific software, visit our Modules page and our Software page.
SU Charges for GPUs
When you run jobs on compute nodes, you are charged SUs. Generally 1 SU = 1 hour on 1 core. Using GPUs will have a higher cost, however. Refer to the Account Management System page for the SU rates for GPUs or other accelerators on each cluster.
Job Submission
Once you have your job script ready, it is time to submit the job. You can submit your job to the Slurm batch scheduler using the sbatch command. For example, suppose you you created a batch file named MyJob.slurm, the command to submit the job will as follows:
[username@terra ~]$ sbatch MyJob.slurm
Submitted batch job 3606
Job Monitoring and Control Commands
After a job has been submitted, you may want to check on its progress or cancel it. Below is a list of the most used job monitoring and control commands for jobs on Terra.
Function |
Command |
Example |
|---|---|---|
Submit a job |
sbatch [script_file] |
sbatch FileName.job |
Cancel/Kill a job |
scancel [job_id] |
scancel 101204 |
Check status of a single job |
squeue --job [job_id] |
squeue --job 101204 |
Check status of all |
squeue -u [user_name] |
squeue -u User1 |
Check CPU and memory efficiency for a job |
seff [job_id] |
seff 101204 |
Here is an example of the information that the seff command provides for a completed job:
% seff 12345678
Job ID: 12345678
Cluster: Terra
User/Group: username/groupname
State: COMPLETED (exit code 0)
Nodes: 16
Cores per node: 28
CPU Utilized: 1-17:05:54
CPU Efficiency: 94.63% of 1-19:25:52 core-walltime
Job Wall-clock time: 00:05:49
Memory Utilized: 310.96 GB (estimated maximum)
Memory Efficiency: 34.70% of 896.00 GB (56.00 GB/node)
Job Examples
Several examples of Slurm job files for Terra are listed below.
NOTE: Job examples are NOT lists of commands, but are a template of the contents of a job file. These examples should be pasted into a text editor and submitted as a job to be tested, not entered as commands line by line.
There are several optional parameters available for jobs on Terra. In the examples below, they are commented out/ignored via ##. If you wish to include these values as parameters for your jobs, please change it to a singular # and adjust the parameter value accordingly.
Example Job 1: A serial job (single core, single node)
#!/bin/bash

##NECESSARY JOB SPECIFICATIONS
#SBATCH --job-name=JobExample1       #Set the job name to "JobExample1"
#SBATCH --time=01:30:00              #Set the wall clock limit to 1hr and 30min
#SBATCH --ntasks=1                   #Request 1 task
#SBATCH --mem=2560M                  #Request 2560MB (2.5GB) per node
#SBATCH --output=Example1Out.%j      #Send stdout/err to "Example1Out.[jobID]"

##OPTIONAL JOB SPECIFICATIONS
##SBATCH --account=123456             #Set billing account to 123456
##SBATCH --mail-type=ALL              #Send email on all job events
##SBATCH --mail-user=email_address    #Send all emails to email_address

#First Executable Line
Example Job 2: A multi core, single node job
#!/bin/bash

##NECESSARY JOB SPECIFICATIONS
#SBATCH --job-name=JobExample2       #Set the job name to "JobExample2"
#SBATCH --time=6:30:00               #Set the wall clock limit to 6hr and 30min
#SBATCH --nodes=1                    #Request 1 node
#SBATCH --ntasks-per-node=8          #Request 8 tasks/cores per node
#SBATCH --mem=8G                     #Request 8GB per node
#SBATCH --output=Example2Out.%j      #Send stdout/err to "Example2Out.[jobID]"

##OPTIONAL JOB SPECIFICATIONS
##SBATCH --account=123456             #Set billing account to 123456
##SBATCH --mail-type=ALL              #Send email on all job events
##SBATCH --mail-user=email_address    #Send all emails to email_address

#First Executable Line
Example Job 3: A multi core, multi node job
#!/bin/bash

##NECESSARY JOB SPECIFICATIONS
#SBATCH --job-name=JobExample3       #Set the job name to "JobExample3"
#SBATCH --time=1-12:00:00            #Set the wall clock limit to 1 Day and 12hr
#SBATCH --ntasks=8                   #Request 8 tasks
#SBATCH --ntasks-per-node=2          #Request 2 tasks/cores per node
#SBATCH --mem=4096M                  #Request 4096MB (4GB) per node
#SBATCH --output=Example3Out.%j      #Send stdout/err to "Example3Out.[jobID]"

##OPTIONAL JOB SPECIFICATIONS
##SBATCH --account=123456             #Set billing account to 123456
##SBATCH --mail-type=ALL              #Send email on all job events
##SBATCH --mail-user=email_address    #Send all emails to email_address

#First Executable Line
Example Job 4: A serial GPU job
#!/bin/bash`

##NECESSARY JOB SPECIFICATIONS
#SBATCH --job-name=JobExample4       #Set the job name to "JobExample4"
#SBATCH --time=01:30:00              #Set the wall clock limit to 1hr and 30min
#SBATCH --ntasks=1                   #Request 1 task
#SBATCH --mem=2560M                  #Request 2560MB (2.5GB) per node
#SBATCH --output=Example4Out.%j      #Send stdout/err to "Example4Out.[jobID]"
#SBATCH --gres=gpu:1                 #Request 1 GPU per node cam be 1 or 2
#SBATCH --partition=gpu              #Request the GPU partition/queue

##OPTIONAL JOB SPECIFICATIONS
##SBATCH --account=123456             #Set billing account to 123456
##SBATCH --mail-type=ALL              #Send email on all job events
##SBATCH --mail-user=email_address    #Send all emails to email_address

#First Executable Line
Example Job 5: A parallel GPU job
#!/bin/bash

##NECESSARY JOB SPECIFICATIONS`
#SBATCH --job-name=JobExample5       #Set the job name to "JobExample5"
#SBATCH --time=01:30:00              #Set the wall clock limit to 1hr and 30min
#SBATCH --ntasks=28                   #Request 1 task
#SBATCH --mem=2560M                  #Request 2560MB (2.5GB) per node
#SBATCH --output=Example5Out.%j      #Send stdout/err to "Example5Out.[jobID]"
#SBATCH --gres=gpu:2                 #Request 2 GPU per node can be 1 or 2
#SBATCH --partition=gpu              #Request the GPU partition/queue

##OPTIONAL JOB SPECIFICATIONS`
##SBATCH --account=123456             #Set billing account to 123456
##SBATCH --mail-type=ALL              #Send email on all job events
##SBATCH --mail-user=email_address    #Send all emails to email_address

#First Executable Line
Example Job 6: A serial KNL job (single core, single node)
#!/bin/bash

##NECESSARY JOB SPECIFICATIONS`
#SBATCH --job-name=JobExample6       #Set the job name to "JobExample6"
#SBATCH --time=01:30:00              #Set the wall clock limit to 1hr and 30min
#SBATCH --ntasks=1                   #Request 1 task
#SBATCH --mem=2560M                  #Request 2560MB (2.5GB) per node
#SBATCH --output=Example6Out.%j      #Send stdout/err to "Example6Out.[jobID]"

##OPTIONAL JOB SPECIFICATIONS`
##SBATCH --account=123456             #Set billing account to 123456
##SBATCH --mail-type=ALL              #Send email on all job events
##SBATCH --mail-user=email_address    #Send all emails to email_address

#SBATCH --partition=knl               #Request the KNL nodes

#First Executable Line
Batch Queues
Upon job submission, Slurm sends your jobs to appropriate batch queues. These are (software) service stations configured to control the scheduling and dispatch of jobs that have arrived in them. Batch queues are characterized by all sorts of parameters. Some of the most important are:
- The total number of jobs that can be concurrently running (number of run slots)
- The wall-clock time limit per job
- The type and number of nodes available for jobs
These settings control whether a job will remain idle in the queue or be dispatched quickly for execution.
The current queue structure is: (updated on January 29, 2020).
Queue |
Job Max Cores / Nodes |
Job Max Walltime |
Compute Node Types |
Per-User Limits Across Queues |
Notes |
|---|---|---|---|---|---|
short |
448 cores / 16 nodes |
30 min / 2 hr |
64 GB nodes (256) |
1800 Cores per User |
|
medium |
1792 cores / 64 nodes |
1 day |
64 GB nodes (256) |
1800 Cores per User |
|
long |
896 cores / 32 nodes |
7 days |
64 GB nodes (256) |
1800 Cores per User |
|
xlong |
448 cores / 16 nodes |
21 days |
64 GB nodes (256) |
448 cores per User |
For jobs needing to run longer than 7 days. Submit jobs to this partition with the --partition xlong option. |
gpu |
1344 cores / 48 nodes |
3 days |
128 GB nodes with GPUs (48) |
For jobs requiring a GPU or more than 64 GB of memory. |
|
vnc |
28 cores / 1 node |
12 hours |
128 GB nodes with GPUs (48) |
For jobs requiring remote visualization. |
|
knl |
68 cores / 8 nodes |
7 days |
96 GB nodes with KNL processors (8) |
For jobs requiring a KNL. |
Checking queue usage
The following command can be used to get information on queues and their nodes.
[NetID@terra1 ~]$ sinfo
Example output:
PARTITION        AVAIL  TIMELIMIT    JOB_SIZE    NODES(A/I/O/T)   CPUS(A/I/O/T)
short*           up     2:00:00      1-16        244/12/0/256     5333/1835/0/7168
Note: A/I/O/T stands for Active, Idle, Offline, and Total
Checking node usage
The following command can be used to generate a list of nodes and their corresponding information, including their CPU usage.
[NetID@terra1 ~]$ pestat
Example output:
Hostname       Partition      Node   Num_CPU   CPUload   Memsize  Freemem       Joblist
                             State   Use/Tot                (MB)     (MB)    JobId User ...
knl-0101             knl    drain$         0        68     0.00*    88000             0
Checking bad nodes
The following command can be used to view a current list of bad nodes on the machine:
[NetID@terra1 ~]$ badnodes
The following output is just an example output and users should run badnodes to see a current list.
Example output:
% badnodes
REASON                                                       USER             TIMESTAMP            STATE        NODELIST
The system board OCP1 PG voltage is outside of range.        root             2022-07-11T14:38:07  drained      fc152
FPGA preparation in progress                                 root             2022-07-12T15:57:01  drained*     fc[125-126]
investigating memverge license issue                         francis          2022-08-09T14:15:05  drained      fc032
investigating unknown memverge issue                         francis          2022-08-09T14:15:19  drained      fc033
fabric 1 hardware failure                                    francis          2022-08-15T13:52:10  drained*     fc[001-006,008,039-040]
Checkpointing
Checkpointing is the practice of creating a save state of a job so that, if interrupted, it can begin again without starting completely over. This technique is especially important for long jobs on the batch systems, because each batch queue has a maximum walltime limit.
A checkpointed job file is particularly useful for the gpu queue, which is limited to 4 days walltime due to its demand. There are many cases of jobs that require the use of gpus and must run longer than two days, such as training a machine learning algorithm.
Users can change their code to implement save states so that their code may restart automatically when cut off by the wall time limit. There are many different ways to checkpoint a job file depending on the software used, but it is almost always done at the application level. It is up to the user how frequently save states are made depending on what kind of fault tolerance is needed for the job, but in the case of the batch system, the exact time of the 'fault' is known. It's just the walltime limit of the queue. In this case, only one checkpoint need be created, right before the limit is reached. Many different resources are available for checkpointing techniques. Some examples for common software are listed below.
Advanced Documentation
This guide only covers the most commonly used options and useful commands.
For more information, check the man pages for individual commands or the Slurm Documentation.