Python
Python is an interpreted high-level programming language for general-purpose programming. Python has had many versions over the years. Most python programs run on Python 2 (example - 2.7.x) or Python 3 (example - 3.6.x).
Running Python Jobs Using Drona Workflow Engine
Drona Workflow Engine, developed by HPRC, provides a 100% graphical interface to generate and submit Python jobs without the need to write a Slurm script yourself or even be aware of Slurm syntax and Python internals. The Drona app is available on all HPRC Portals under the Jobs tab (Screenshot) .
you will find Python in the Environments Dropdown (Screenshot). NOTE: If you don't see Python in the Environments Dropdown, you need to import it first. Click on the + sign next to the environments dropdown and select the Python environment in the pop-up window. You only need to do this once. See the import section for more information about environments.
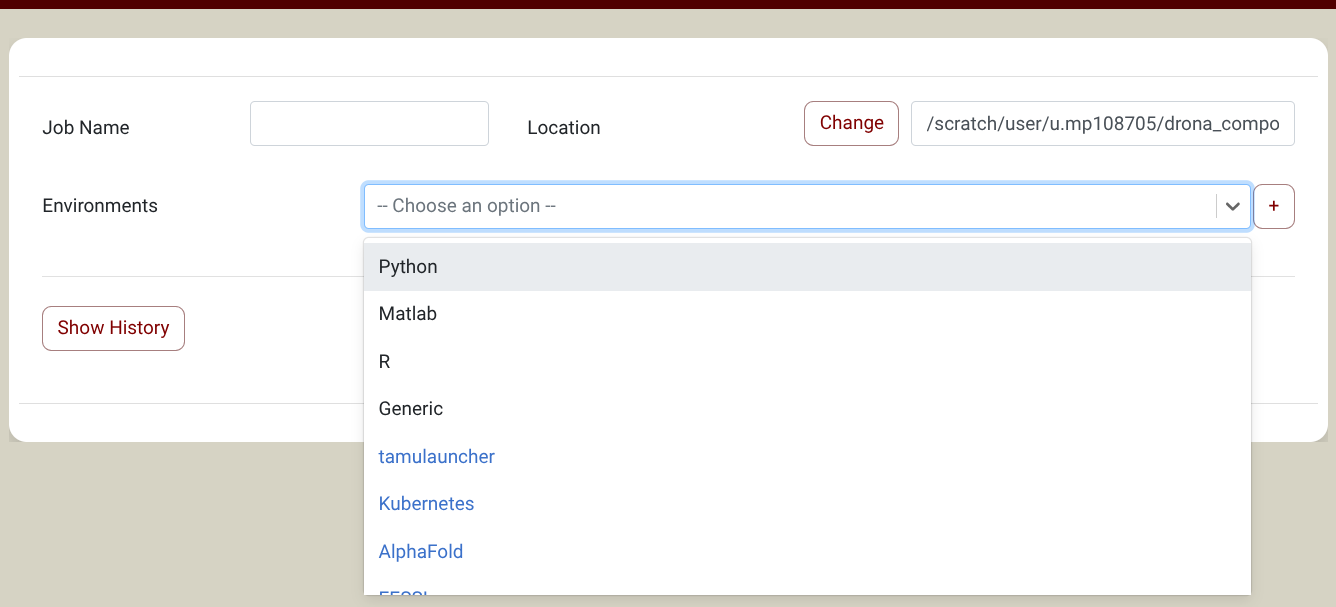
Once you select the Python environment, the form will expand with Python specific fields (Screenshot) to guide you in providing all the needed information. To generate the Python job files, click the Generate or Preview button. This will first show a fully editable preview screen with the generated job scripts. You are welcome to inspect the generated files and make edits if needed. To submit the job, click on the submit button, and Drona will submit the generated job on your behalf. For detailed information about Drona Workflow Engine, checkout the Drona Workflow Engine Guide
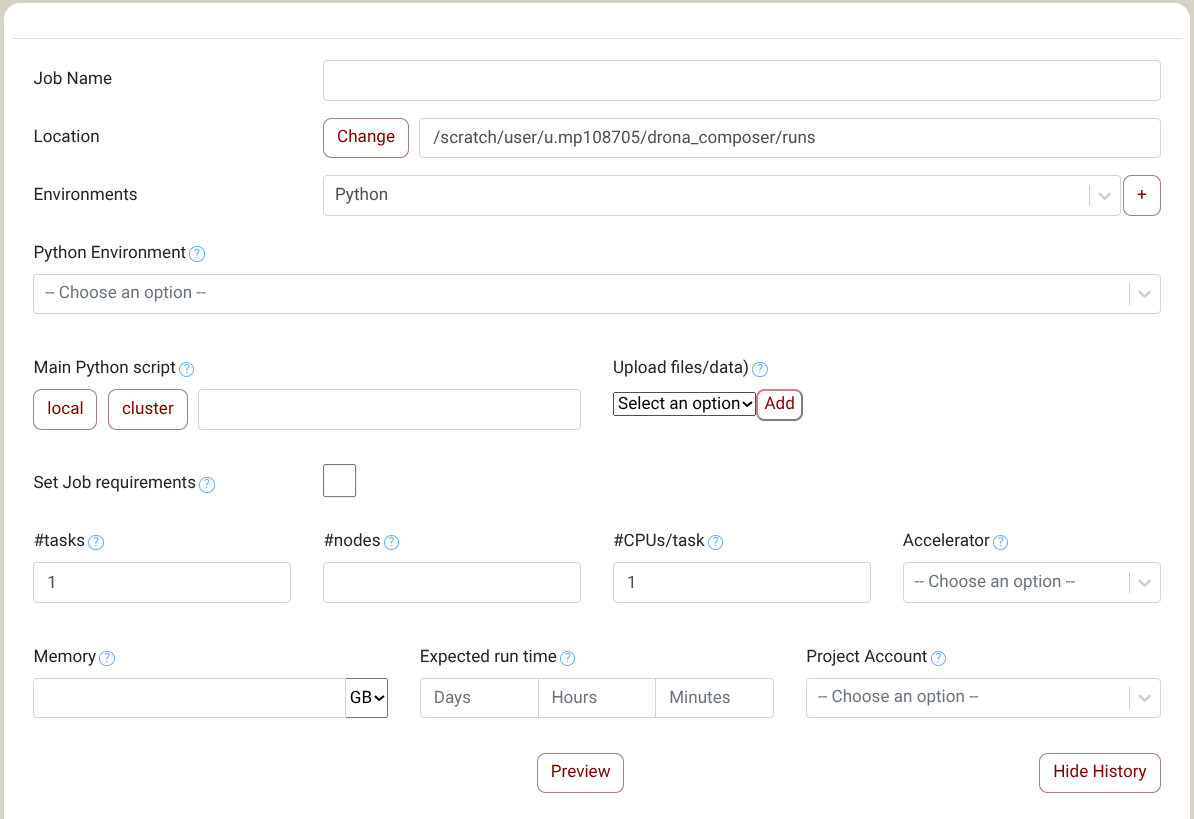
If you experience any issues or have any suggestions, please get in touch with us at [email protected]
Python Versions and environments
Choosing Which Python Version to Use
Your project may require a specific python language version, or you may want to use the most recent version of python. To find what versions of Python are available, use the following command:
[NetID@cluster NetID]$ module spider Python
You will also need to load the required toolchain with your desired version of Python. To do this you may use the same command, but with the specific version included. Here is an example:
[NetID@cluster NetID]$ module spider Python/3.10.8
The results will show the required toolchain for that version of Python. You can then load both the toolchain and Python version:
[NetID@cluster NetID]$ module load GCCcore/12.2.0 Python/3.10.8
Once you decide your version, make sure to continue your work on the same version. Changing versions or toolchains may cause errors. Please refer to our Module Systems page and our Toolchains page for information on loading modules and choosing a toolchain.
You can use the following example command for unloading python 3:
[NetID@cluster NetID]$ module purge
Write the following command, if you want to check the python language version that you are currently using.
[NetID@cluster NetID]$ python --version
Python Packages and Modules
Some versions of Python on our systems will already include desired packages such as SciPy, PyTorch, matplotlib, scikit-learn, or TensorFlow. If you only need one of these packages, you may search for a Python module with it pre-installed. Below is an example:
[NetID@cluster NetID]$ module spider SciPy
Note: NumPy is included in SciPy-bundle.
After loading the desired Python Module, the "pip list" command will show the default python packages available.
[NetID@cluster NetID]$ pip list
My Package/Module is Missing
NOTE: Users don't have permission to install new packages using "pip install" command directly on the terminal. Users need to create a virtual environment for that purpose.
Users first need to create a private virtual environment and install packages in that environment. You only need to create virtual environment and pip install packages once.
Virtual Environments
Virtual environments allow you to install new packages for python on our clusters.
ModuLair - HPRC venv management tools
Users are encouraged to use ModuLair, the suite of virtual environment management tools available on our clusters. Users can either use the tools through the command line or through the GUI on our clusters' interactive dashboards.
The ModuLair page can be found here.
Manually Create a virtual environment
Users should create virtual environment inside "scratch" and preferably inside their project directory. The next few commands show how to create a virtual environment inside a new project directory. We recommend enabling system-site-packages so that any other modules you load will continue to function.
[NetID@cluster NetID]$ module load GCCcore/12.2.0 Python/3.10.8   # Load Python module
[NetID@cluster NetID]$ cd $SCRATCH                            # Go to scratch directory
[NetID@cluster NetID]$ mkdir python_project                   # Make a new directory named python_project
[NetID@cluster NetID]$ cd python_project                      # Go to the project directory
[NetID@cluster python_project]$ python -m venv --system-site-packages ./venv               # Make a virtual environment "venv"
Activate/Deactivate virtual environment
This section shows how to activate and deactivate the virtual environment. You have to give path from your project directory
[NetID@cluster NetID]$ module load GCCcore/12.2.0 Python/3.10.8         # Load Python module
[NetID@cluster NetID]$ cd $SCRATCH/python_project                   # Go to the project directory
[NetID@cluster python_project]$ source venv/bin/activate            # Activate virtual environment (Command line should show environment name on left)
(venv) [NetID@cluster python_project]$ pip list                     # Check the packages in environment
(venv) [NetID@cluster python_project]$ python --version             # Check the python version in environment
(venv) [NetID@cluster python_project]$ deactivate                   # Deactivate virtual environment
[NetID@cluster python_project]$                                     # Command line returns to normal
Install/Uninstall packages in virtual environment
To install packages, we first have to load python module and activate our environment. The next few commands show installation/uninstallation of the numpy package using "pip install" command.
[NetID@cluster NetID]$ module load Python/3.6.6-intel-2018b         # Load Python module
[NetID@cluster NetID]$ cd $SCRATCH/python_project                   # Go to the project directory
[NetID@cluster python_project]$ source venv/bin/activate            # Activate virtual environment
(venv) [NetID@cluster python_project]$ pip install numpy            # Install numpy package
(venv) [NetID@cluster python_project]$ pip list                     # Check the packages in environment
(venv) [NetID@cluster python_project]$ pip uninstall numpy          # Uninstall numpy package
(venv) [NetID@cluster python_project]$ deactivate                   # Deactivate virtual environment
Remove a virtual environment
You can delete the environment folder using "rm -r venv" command. Answer with "y" if there are questions about write protected files.
Virtual Environment with Anaconda
See our Anaconda wiki page for details on creating an environment using Anaconda which is also used for Jupyter Notebook and JupyterLab on the HPRC portal.