Graphcore Colossus IPUs
The poplar1 IPU Pod16 system is equipped with 16 Colossus GC200 IPUs. From the ACES login node, ssh into the poplar1 system.
[username@aces-login2 ~]$ ssh poplar1
Set up the Poplar SDK environment
In this step, set up several environmental variables to use the Graphcore tools and Poplar graph programming framework.
[username@poplar1 ~]$ source /opt/gc/poplar/poplar_sdk-ubuntu_20_04-[ver]/poplar-ubuntu_20_04-[ver]/enable.sh
[username@poplar1 ~]$ source /opt/gc/poplar/poplar_sdk-ubuntu_20_04-[ver]/popart-ubuntu_20_04-[ver]/enable.sh
Example commands with an existing version on ACES:
source /opt/gc/poplar/poplar_sdk-ubuntu_20_04-3.4.0+1507-69d9d03fd8/poplar-ubuntu_20_04-3.4.0+73-aa67dd6164/enable.sh
source /opt/gc/poplar/poplar_sdk-ubuntu_20_04-3.4.0+1507-69d9d03fd8/popart-ubuntu_20_04-3.4.0+73-aa67dd6164/enable.sh
mkdir -p /localdata/$USER/tmp
export TF_POPLAR_FLAGS=--executable_cache_path=/localdata/$USER/tmp
export POPTORCH_CACHE_DIR=/localdata/$USER/tmp
Set up environments of frameworks for IPU
PyTorch (Poptorch)
Set up PyTorch (Poptorch) for IPU
The local home directory is small (300G total). You can store large files in /localdata/username (or use localdata symlink from your home directory). /localdata has 3.5TB available.
[username@poplar1 ~]$ cd /localdata/$USER
[username@poplar1 localdata]$ python3 -m venv poptorch_test
[username@poplar1 localdata]$ source poptorch_test/bin/activate
[username@poplar1 localdata]$ python3 -m pip install -U pip
[username@poplar1 localdata]$ python3 -m pip install <sdk_path>/poptorch_x.x.x.whl
For
Clone a copy of the Graphcore tutorials repository and change the directory to mnist
[username@poplar1 localdata]$ git clone https://github.com/graphcore/examples.git
[username@poplar1 localdata]$ cd examples/tutorials/simple_applications/pytorch/mnist/
Install the dependencies and run the model
[username@poplar1 mnist]$ python3 mnist_poptorch.py
TensorFlow 2
Set up TensorFlow 2 for IPU
The local home directory is small (300G total). You can store large files in /localdata/username (or use localdata symlink from your home directory). /localdata has 3.5TB available.
[username@poplar1 ~]$ cd /localdata/$USER
[username@poplar1 localdata]$ python3 -m venv venv_tf2
[username@poplar1 localdata]$ source venv_tf2/bin/activate
[username@poplar1 localdata]$ python3 -m pip install <sdk_path>/tensorflow_x.x.x.whl
For
Clone a copy of the Graphcore tutorials repository and change the directory to tensorflow2/keras/completed_demos
[username@poplar1 localdata]$ git clone https://github.com/graphcore/examples.git
[username@poplar1 localdata]$ cd examples/tutorials/tutorials/tensorflow2/keras/completed_demos/
Run the model
[username@poplar1 completed_demos]$ python3 completed_demo_ipu.py
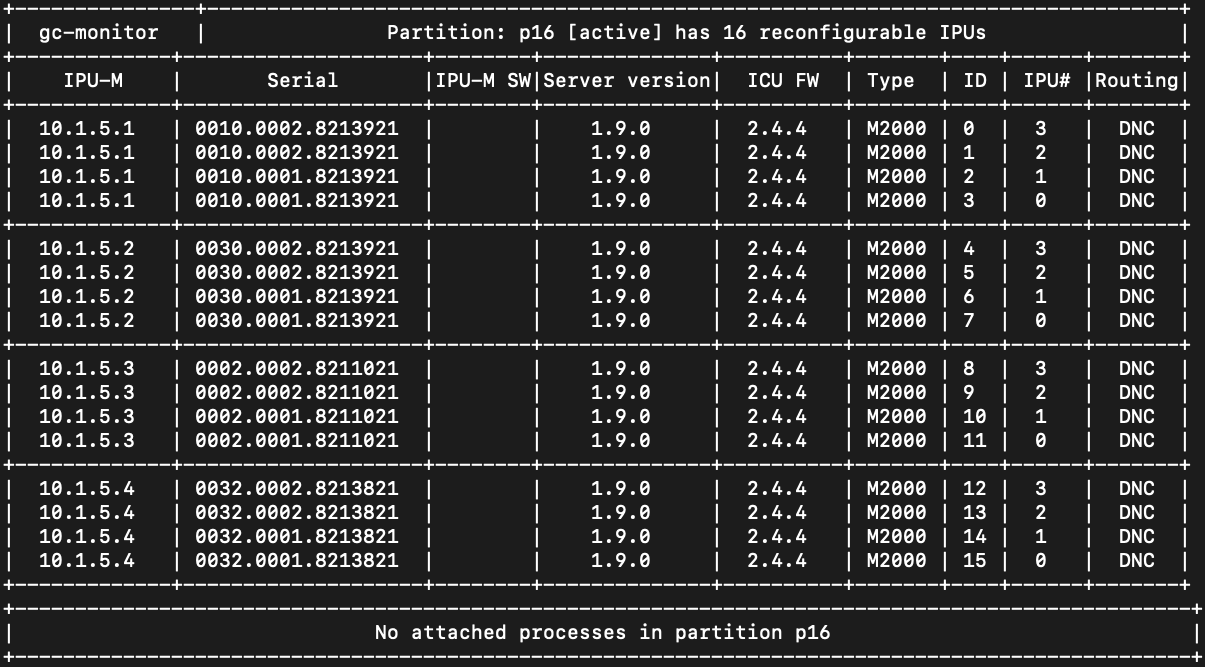
gc-monitor
gc-monitor is a command-line utility that provides a comprehensive overview of IPU device information, including details about any processes that are utilizing the IPUs.
Graphcore Documentation can be found at https://docs.graphcore.ai/en/latest/